Let's say you're plane crashed and you were stranded on a island. You hurt your side and you needed stitches. There was no hospital. Could you tell someone how to stitch you up? Could you do it to someone else?
Okay, let's go for something a little more realistic. Say that a huge earthquake hit your living area. All the hospitals in the area were damaged and overflowing with critical patients. Your friend, family member, boss etc. needs stitches.
You could do it.
How?
Determine if a cut needs stitches
- Try to stop the bleeding first by applying pressure for about 5 minutes. Then see if the bleeding has stopped.
- If it's still bleeding uncontrollably, keep the firm pressure and seek medical help if possible. If you can't, do your best with what you have.
- See if you can decide what kind of wound you have. (Click on the link at the bottom for a website. It will open in a new page.)
- Look at the depth. If you see yellow, fatty tissue, bone or if the wound is more then 1/4 inch (6mm) deep; it's probably eligible for stitching.
- Look at the width. Can the skin be pulled back together easily and held with a bandage? If so, keep it under a bandage and it will probably scab over in less 12 hours and start healing itself.
- If the wound is in an area of the body that has a lot of movement, it might be a good idea to have stitches just to keep the wound from reopening.
Preparing to administer stitches
You will need:
- Sewing needle. Try to go for the smaller sizes. Those are better.
- Disinfectant
- Bandage
- Probes/Cleaning tools
- Sterilize the site. Begin by soaking the area completely in disinfectant. Some pain may be needed to get all foreign materials out of the wound.
- If the wound is clean, dry the area.
- Sterilize your utensils. They must be completely sterilized or that would defeat the purpose of cleaning, stitching and bandaging the wound. It may be a good idea to start the soaking in disinfectant while you're working on the wound site.
Sewing the wound
Now you will start sewing. Start at the place closet to your face and sew away from you.
You will notice that the immediate edge of the wound would have become numb and will be able to be pierced with little to no discomfort.
Make sure you keep as close to the edge as possible without it releasing the stitch.
We will start to the left of the wound with a initial holding stitch.
Insert the needle downwards through to the sub-dermal layer of the skin. At this point you will need to level off the needle and venture through the wound and to the adjacent wall of the wound.
Once across the other side of the wound return the needle to the skins surface through the sub-dermal layers of skin.
We need the needle to go deep enough as to not release the skin through a tear.
Once we have reached the right hand side of the wound we need to make a diagonal path across the wound again to the next point.
Once you have zig zagged your way to the top of your wound make sure to tie off with a decent knot.
-http://www.instructables.com/id/Stich-Yourself-Shut-Sugery-at-home/step5/Sewing-the-wound/
Now you bandage the area.
Fun Fact:
Stitches are also called Sutures. If you look at the top of a skull, you will see "stitches" on the top. Those are also called Sutures.
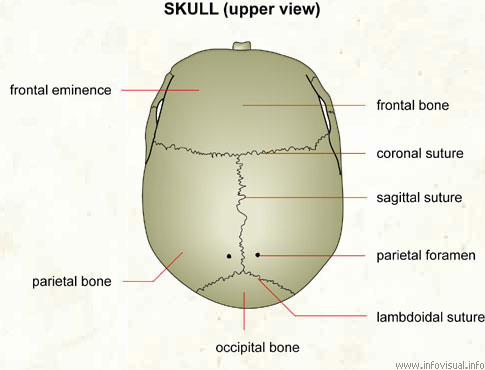
Picture taken from: http://www.infovisual.info/03/017_en.html
http://www.wikihow.com/Determine-if-a-Cut-Needs-Stitches
 RSS Feed
